Word Clouds for the Classroom

Who doesn’t love a word cloud?  They’re so fun and students LOVE to create them.  This word cloud was created using Tagxedo, Word Clouds with Style. Not only was it fun, but is was EASY to do…and FREE.

There are many ways you can use word clouds in your classroom.  This is  an example of an About Me cloud. Have students start by listing all the words that describe them.  In my example, I did just that.  After about fifteen words I was stumped and lets face it, word clouds just aren’t as cute if you only have a handful of words.  So I chose two words that I felt described me the most and used the handy “Synonym:” method in my google search.  I copied the results from that search and pasted them into the text field of Tagxedo and presto, I had more words to add to my word cloud!  Here’s what that looks like:

“synonym:happy”= blessed, blest, blissfulblithe, can’t complain,captivated,
cheerful, chipper, chirpy, content,contentedconvivialdelightedecstaticelated,
exultant, flying high, gayglad, gleeful, gratified,intoxicatedjollyjoyfuljoyous,
jubilantlaughinglightlively, looking good, merry,mirthful, on cloud nine,
overjoyedpeaceful,peppyperky,playfulpleasantpleased,sparklingsunny,
thrilled, tickled, tickled pink,upupbeat, walking on air

You might notice in the example that some of the words are larger than others.  There are advanced features in word cloud generators that allow you to customize the size of text, but an easy way to do that is to just add more of the word you want to enlarge.  Here’s an example:

These words, “Web~2.0, Web~2.0, Web~2.0, Create, Collaborate, Social, web-based, global, anywhere, learn,” made,

Notice the use of the tilde (~) connected Web and 2.0 together.

Tagxedo also has cool shapes you can choose from to customize your word cloud, that’s what makes it different than Wordle, another cool word cloud creator that was used to create the example above.  In addition, you can choose your own images to upload to Tagxedo to shape your cloud.  In my example, I used the shape of the Big Island of Hawai’i since that’s where I’m from.  This is something you’ll want to play around with a little.  I used photoshop to get my shape just right to work with my cloud (tutorial coming soon).

How can word clouds be used in your classroom?  Luckily, there are some awesome bloggers out there who share lesson ideas with the rest of us!  Here are just some of the great ideas and examples teachers are using in their classrooms:

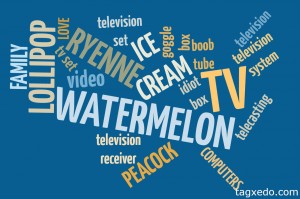
Here’s an example of my 8 year old’s word cloud created in Tagxedo (She use synonym:TV to get extra words…I would have preferred “family”, but it’s her cloud…):

Have you used word clouds in your classroom?  Do you have any tips to share?  Student samples?  Tell us about it!

21st Century Professional Development

I just spent the last two days immersed in 21st century professional development.  Yesterday, I was fortunate enough to polycom all day with Alan November (@globalearner) along with @carmenstack, @kaleichang, and @KSHAlumnai.  Today, I attended the Schools of the Future Conference where @globalearner, and my most favorite, @torres21, were the keynote speakers.  If I tried to share everything I learned, this blog post would be way too long to read, so I want to just share two of my main take aways for the last two days:

  1. We need to ask more questions – not only do we need to ask more questions, but we need to listen to our students questions, and provide them with opportunities to question. (more on this in a future blog post)
  2. Get on twitter – use it for PD.

Twitter has changed my life.  A couple of years ago I heard about it and created an account because I wanted to see what the buzz was about.  But I didn’t truly understand the power of twitter and professional development for teachers until I watched a youtube video created by @stumpteacher.  I want to share that video with you.  And I want you to share that video with everyone you know.  You don’t have to be a teacher to take advantage of the learning and sharing that twitter can provide.

I hope this video enhances your professional learning as much as it has enhanced mine.


Alternatives to PowerPoint

Edutopia has an excellent Summer PD titled, Web Tools Collective Series.  I just read Part 4 of the series and my absolute favorite Youtube Video about how not to use PowerPoint was shared:

We’ve all probably experienced this when attending presentations, which is why this video is SO funny.  I laugh every time I watch it!  So how do we teach our students to give good presentations?

ReadWriteThink and PowerPoint in the Classroom both have excellent resources for teaching kids how to create effective and meaningful PowerPoint presentations.  But we also have to remember with the emergence of Web 2.0 tools, there are now FREE alternatives to PowerPoint.  Below are just a handful of some of the Web 2.0 Tools that students can use to create presentations:

The beauty of the above tools:

  • They’re accessible from any computer, anywhere as long as one has internet connection
  • They can been shared with peers, students, parents, etc.
  • They allow for collaboration
  • They don’t require a flash drive

One important thing to consider when using any Web 2.0 Tool in the classroom is the terms and conditions of the tool.  Lucie deLaBruere has put together an excellent resource for information addressing terms and conditions of Web 2.0 tools and privacy policies.  Find it here.

What’s your favorite presentation tool?  Do you have any student samples you can share?

Adding Attachments to Your KS Blog


Sometimes when you write a blog post, you want to make documents available for your readers to download.  Hereʻs how to add an attachment to your KS Blog:


  1. Decide how you want your attachments inserted, for example:a.  Click here to download document
    b.  Click on the link below to download document
    Adding a Post 


  2. Click on the icon that looks like a sun above your tool bar.  When you hover your mouse over it it will say, “add media”.
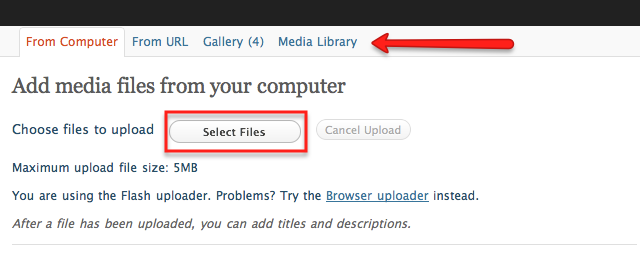
  3. In the shadow box you will notice at the top there are different places you can upload your media from.  In this example, weʻre going to upload from our computer.  Simply click on,
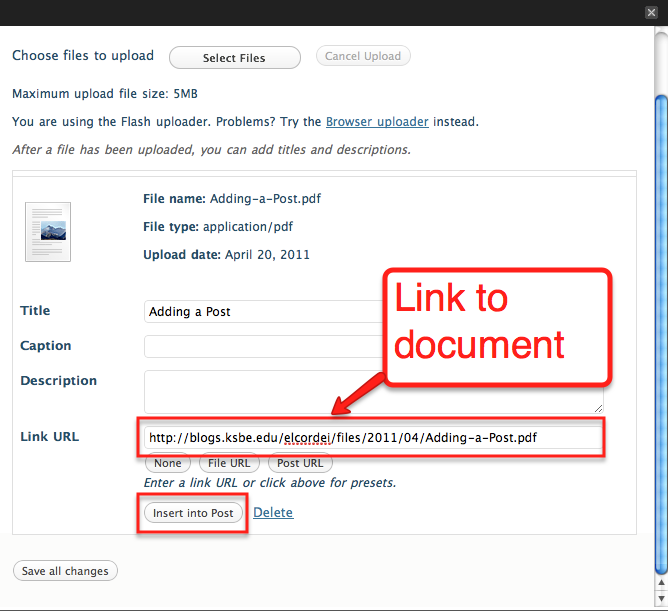
  4. Notice in the next window a link is created to the document.  For example b above, you would simply click on “Insert into Post” and your document will be linked in your post.  for example a above, select and copy the link to the document and exit out of the window.
  5. In your post, highlight the word you want your reader to click on to download the document.  In example a, I used the word “here”.  Highlight the word and then click on the link icon in your toolbar.

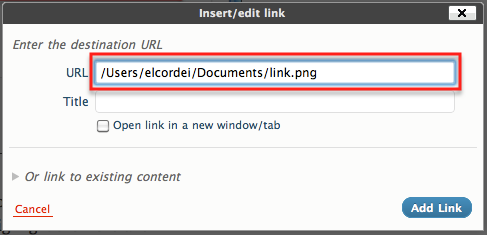
  6. Paste the link to your document in the url field in the next window and then choose, add link.

Update your blog and, Voila!  Now you can link!

Note – because not all blog readers have the same programs on their computers, itʻs a good idea to link to PDFs.

Twitter…Yes? No? Maybe?

This post is part of an Online Communication PD Class…

After the Introduction to Twitter Class and reading through the HW assignments…

  1. Can a micro-blogging tool accommodate communication and learning in the classroom?
  2. Will you use twitter as part of you PLN?
  3. What drawbacks can there be in using a tool like this one?
  4. If the tool must fit the purpose, how, when and where will you use this tool as teacher?


Embedding Video From Your KS Website Account

So you have a movie you’ve created, or one of your students has created, and you’ve published it to your KS Website and now want to have it embedded in your blog.  Well…here’s how:

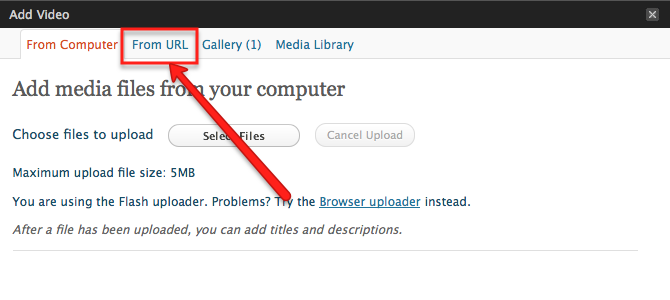
Step 1: Create a new post and click on the Add Video Icon

Step 2: A shadowbox will open.  Click on the URL tab

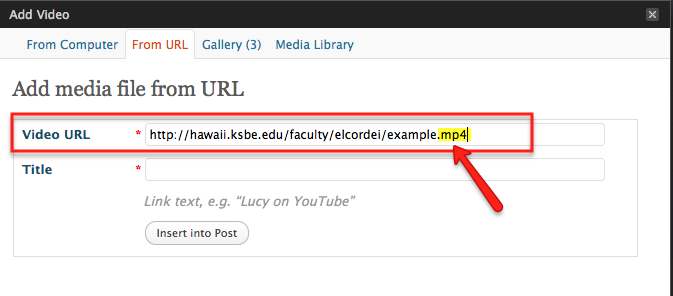
Step 3: Open a new tab and navigate to your KS Website where your movie is hosted.  Copy the url (web address)

Step 4: Click back over to your post and paste the URL into the Video URL field.  Add “.mp4” to the end of the video URL

Step 5: Click Insert into Post and then Publish and Voila, your video is now embedded into your blog!

Here’s a video tutorial using this method:

EmbeddingVideo.mp4

Embedding Video Into your Blog

There are a couple options for embedding video into your blog.  This tutorial will show you how to embed video from a video hosting websites like Youtube, Vimeo, and Teacher Tube.

Step 1: Go to the website the video you want to use is hosted at. 

Step 2: Find the “embed” code, it might be a button you have to click on

Step 3: Copy the Embed Code

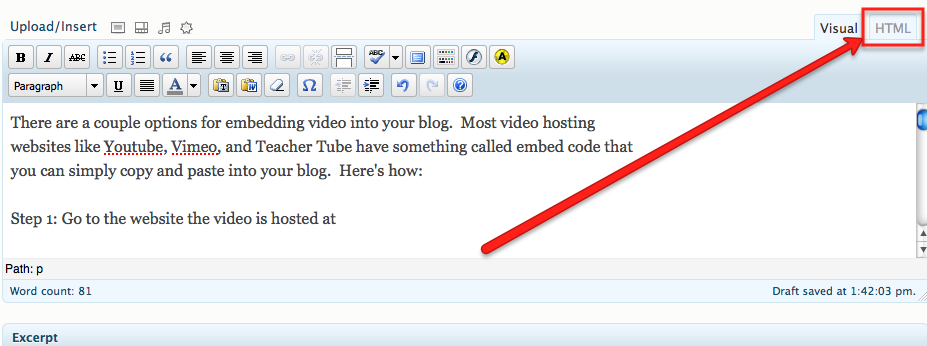
Step 4: Create a New Post in your Blog and toggle to HTML View

Step 5: Paste the code

Step 6: Click publish and Voila, your video is embedded!

Try it and let me know how it works!

What’s Your PLN Like?

Diagram by: Alec Couros


I have only recently become more savvy in learning through my Personal Learning Network (PLN).  I used to spend hours on the internet, hunting for information.


The old me:

  • Googled lesson plans
  • Rarely bookmarked
  • Visited only my favorite resources…sometimes (EdutopiaT.H.E Journal,eSchool NewsTeacher Tube, etc.)
  • Only used Facebook for socializing
  • Had a Twitter account because I heard about it, but I never really used it
  • Wasted a lot of time looking for that “awesome website I saw a couple months ago, but I don’t remember what it was titled”
  • Shared “stuff”…but only in my school

Now I:

  • Still Google Lesson Plans, but I know how to use quotes and + and – now AND have you seen all the cool Google tools on the left?
  • Bookmark the sites I need to access for work
  • Use iGoogle as a reader to bring the information to me
  • Follow my favorites on Facebook (GlogsterEdublogs, etc.)
  • Use twitter to follow Ed. Tech experts (and more…)
  • Use Later This so I don’t loose that awesome website that I don’t have time to read right now but don’t want to loose it…
  • Share globally through my blog, google sites, classroom 2.0, wikis and more
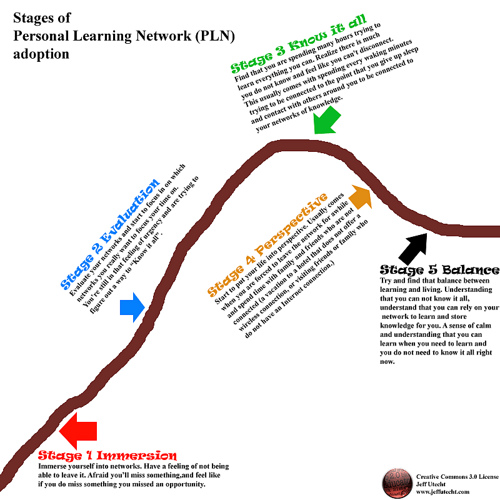
Jeff UTecht’s Stages of Personal Learning Networks Adoption

If you look at Jeff Utecht’s Stages of Personal Learning Network Adoption, I think I go back and forth between Know it All and Balance.  I often find myself wanting to learn more and more and more, and then there are days when I’m all good and know I can tap in when I’m ready.

I think I manage my PLN pretty well, but I also know I have a lot to learn.  There are tools out there that can help me manage it all better, and the best is probably yet to come, and then something better will come along.

What’s your Personal Learning Network like?


Go Get Glogged With Glogster

If you haven’t noticed, Glogster EDU is one of my absolute favorite Web 2.0 tools.  So this morning when I was checking my facebook page and saw today’s Edublogs’ Free Tool Challenge was titled, Go Get Glogged With Glogster, I had to share.

Even if you’ve used Glogster in your classroom, go check out Go Get Glogged With Glogster.  Not only does the post contain excellent resources and ideas for using Glogster, but the author, Glenda Morris, also links to information about using Creative Commons in Glogs.  In fact, here’s a Glog she created on Creative Commons:

If you take on this challenge, send me the link to your post. I’d love to check it out! 🙂