Category Archives: Ed. Tech Resources

Introduction to Blackboard – Course 1 of 3

Course Dates: August 30 – October 11 – Every Thursday
Course Meeting time: 3:15pm – 4:30pm
Seats Available: 8 KSH, 8 KSK, 8 KSM

Course Description for Introduction to Blackboard :
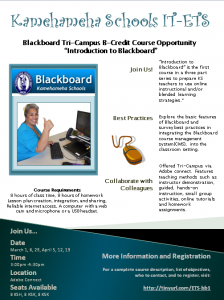
“Introduction to Blackboard” is the first course in a three part series to prepare Kamehameha Schools teachers to use online instructional and/or blended learning strategies.* The “Introduction to Blackboard” course will allow Kamehameha Schools faculty to survey best practices in integrating the Blackboard course management system(CMS), into the classroom setting. Participants will explore the basic features of Blackboard as well as the NETS standards. This exciting course will be offered Tri-Campus via Adobe connect and feature teaching methods such as instructor demonstration, guided, hands-on instruction, small group activities, online tutorials and homework assignments. As a final component, participants will create a lesson plan using the Project Planning Guide developed by ETS-i aligned to standards as well as the Working Exit Outcomes(WEO). There will be 8 instructional hours and 8 hours of required homework assignments.

* Blended Learning – 80% online and 20% face to face as identified by the Tri-Campus Blended Learning Project Charter.


Course Objectives:

At the conclusion of this course, participants will be able to:

  • Effectively navigate through Blackboard
  • Create course content in Blackboard
  • Understand and utilize basic Blackboard course tools
  • Understand basics of the Blackboard grade center
  • Manage users and groups in Blackboard
  • Create and share a lesson within Blackboard utilizing the ETS-I project planning template aligned to NETS standards and the WEO


Course Requirements:

In order to receive 1 B credit, participants will be required to complete the following:

  • 8 hours of synchronous instruction through Adobe Connect
  • 8 hours of class work
  • Creation of lesson demonstrating technology integration and relevant standards alignment
  • Presentation of lesson to cohort and instructor

In addition to coursework, participants must be able/willing to:

  • Meet once per week after school for 1 to 1.5 hours online for instructional purposes (dates and times TBA)
  • Have reliable internet access during instructional time
  • Integrate the created lesson into at least one of their current courses


Application Process:

KSH & KSM Campuses: Log-on to My Learning Plan to register and gain approval from your supervisor.  Course Listing will be available August 16, 2012

KSK: Complete your Pers-35 form to gain approval from your supervisor. Once you have approval, please contact Tim Freitas (see below) to secure your spot in the course.

Please be aware that space is limited.

For more information and/or questions, please contact your respective campus ITS or ITRT.

Name

Campus

email

Ellen Cordeiro Hawaii elcordei@ksbe.edu
Kelly Cua Maui kecua@ksbe.edu
Tim Freitas Kapālama tifreita@ksbe.edu
Lance Ogata Kapālama laogata@ksbe.edu


Animoto

Animoto is a Web 2.0 tool that allows you to create movies with photos, video clips and music.  Animoto has FREE accounts for educators with the capability or creating 50 student accounts.  Need more than 50 accounts?  According to this thread, just let their help desk know and Animoto will create more accounts for you.

Here’s how you sign up for an educator account:

  1. Go to http://animoto.com/
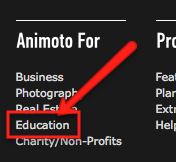
  2. Scroll to the bottom of the page and click on Education

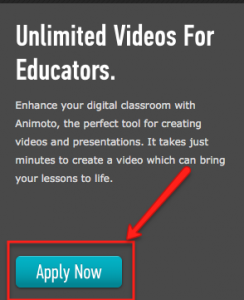
  3. Click on Apply Now

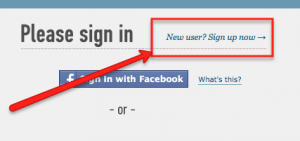
  4. Click on New User – Sign Up
  5. Fill out the form with your school email address
    Note – your students would not use their full names at this step, but the alias you assign
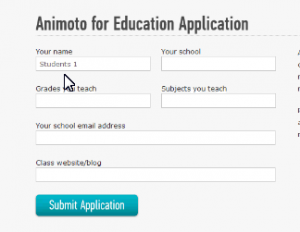
  6. Fill out the application (don’t worry about adding a website)
  7. You will then receive a code which will also come to you via email.  This is the code you will use to create your students accounts.  In step 5 (above) open the box that says Do you have a promo/referral code?  Enter the code and click Sign Up.

You’re now ready to create your first Animoto!

Adding Students:

When creating accounts for students, you’re going to use the same promo code you used to create your account.  I would suggest creating the accounts for your students yourself and then assigning them their user names and passwords.  Remember, do not use students FULL names when using animoto.  While all movies your create are private by default, they can still be shared with anyone who has the link.  When you create their accounts, it would be best to use the gmail trick as our (KS) student email includes student entire firstname and lastname.  Click here for instructions on how to create dummy emails using gmail for your students.

Remember, if you need more than 50 student accounts, you need to contact Animoto’s help desk and request them.

Resources

Need a tutorial for creating your first Animoto?  Here’s a great demonstration by Carmen Wedman, District Instructional Technology Coordinator for Wild Rose Public Schools.
http://wrsdtech.weebly.com/2/post/2012/02/animoto.html

I love Teach With Web 2.0!  Their Wiki is an excellent resource in general.  Their Animoto page includes lesson plans, rubrics, ideas for integration and samples.  What more do you need as a teacher?
https://teachwithweb2.wikispaces.com/Animoto 

And of course, my favorite…edublogs teacher challenge.  Here’s their Animoto Challenge.
http://teacherchallenge.edublogs.org/2011/04/06/free-tools-challenge-12-video-music-and-visual-presentations-with-animoto/

Here’s the presentation created to introduce teachers to Animoto:


Please add a comment if you know of any other awesome Animoto resources or want to share some cool ideas!

Tagxedo Header

Final Product By: Charlie

I was inspired by Melelani Spencer when I had the opportunity to work with her students the other day in her 6th grade Hawaiian Studies Classroom to create my awesome I ♥ edtech header.  Students were finishing up a unit on Kauikeaouli (Kamehameha III) and Kumu Mele wanted them to create a Tagxedo of Kauikeaouli’s Kingdom of Hawai’i Constitution of 1840.  Before we could go there, however, we needed to make sure students knew how to use Tagxedo.  So here’s what we did:


  1. Created a text file of their name in PowerPoint
  2. The slide was exported as a jpeg
  3. The jpeg was uploaded to tagxedo

And here’s a sample of the finished product:

Click here if you’d like a copy of the instructions we gave students.  It’s in word so feel free to make any changes.

We were going to use Photoshop to create the jpeg of their names, but decided using PowerPoint would save us some time.  Just something to note when you’re using Tagxedo, it requires a silverlight plugin to run. Our Middle School is on Macs so we needed to make sure the Plugin was installed before we started this project.  Even with our planning ahead, the silverlight plugin crashed on a handful of computers which threw a wrench in our lesson.  If it happens to you, here’s what you do:

  1. Click on your Macintosh HD
  2. Click on your home (little house with your name)
  3. Open your library folder
  4. Open the Internet Plug-ins folder
  5. Drag the silverlight.plugin into the trash
    Note: If for some reason you can’t find it in the Internet Plug-ins folder, just do a search for it.
  6. Re-install the silverlight

LiveBinders in the Classroom

Our most recent technology workshop was on using LiveBinders in the classroom.  What are LiveBinders you ask?  They’re basically virtual three ring binders where you can organize all of your websites, documents, movies, and images into tabs and subtabs and then share your “stuff” on the web. Click on the binders below to see some examples:

We’re using LiveBinders as ePortfolios, but here are some other ideas:

  • Class Resources – Don’t just bookmark your resources, but LiveBinder them and share your binder.
  • Create a Presentation – Use LiveBinders to present your information.  Don’t make handouts, share the link to your binder and embed it in your blog.
  • Create a Webquest – so easy to navigate through the different tasks!
  • Have your students collaborate on a Binder as a final product of a unit
  • Use a LiveBinder to demonstrate the writing process – create a tab for each draft/activity

But the best place to find ideas on how to use LiveBinders is to browse the featured binders on their website.

Now here come the resources…

LiveBinders
Teach with Web 2.0 put together an awesome resource to get you started using LiveBinders.  In fact, their Wiki is an incredible Web 2.0 resource in general…as the name suggests.

LiveBinders 4 Teachers
This workspace was created for educators to share and categorize livebinders by subject, grade-level, and whatever else makes sense.

LiveBinders Tips and Tricks
Here’s a great place to information on how to make your LiveBinders even better.

Free Tools Challenge #15: Organize and Share with LiveBinders
Edublogs has an awesome teacher challenge for those interested in learning more about Web 2.0.  This one is on LiveBinders.

Printable LiveBinder Tutorial
Please feel free to use this and edit.

Presentation:

Hints –

  1. Think of the layout of your page as a PowerPoint layout.
  2. Re-size your images for the web before you publish them.
  3. LiveBinders doesn’t have a classroom account yet, however, check out this blogpost from Mark Brumly on how to use gmail to create student accounts that you can control.

Tell us your ideas for using LiveBinders!


QR Codes in the Classroom

Who knew these little black squares would have so much classroom application?  On Monday we had a QR Codes in the Classroom Workshop and it was SUPER fun.  Here’s how it went…


Qr codes intheclassroom_slideshare

The presentation above was used to introduce participants to QR Codes.  I think a lot of people think you need a smart phone or mobile device to read QR Codes, but the truth is, all you need is a computer with a web-cam.  This is important because while many schools are going mobile, there are sill many schools out there that don’t have the funding for mobile devices.

After the presentation came the fun.  Prior to the workshop, i-nigma, was downloaded to iPod touches for participants to use.  I used Kaywa to generate QR Codes for multiple classroom application examples (the actual codes are at the bottom of this post).  Here’s what they were:

  • Link to a book review (Language Arts)
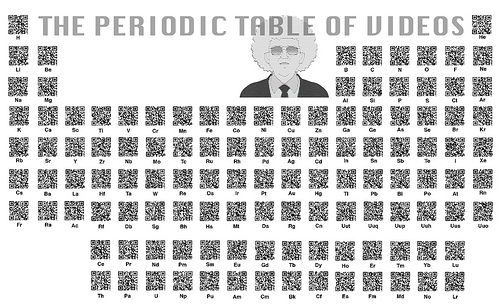
  • Link to The Periodic Table of Movies (Science)
  • Link to a YouTube video demonstrating the proper form of a Push-Up (PE)
  • Link to a nutrition website (Health)
  • Link to an oli (Hawaiian Chant)
  • Link to a Poll Everywhere Question
  • Link to a movie demonstrating how to create a Factor Tree (Math)
  • Link to a Google Form

I set up stations around the room with some of the QR Codes mentioned above.  The others I put up around campus and generated clues to where the outside codes were to give teachers the experience of what a QR Code Scavenger hunt might be like.  Teachers were given a handout and used the QR Codes to answer the questions on their handout.

Overall, teachers really enjoyed the workshop.  We had a great discussion about how QR Codes can enhance instruction and really make the “ol’ worksheet” an interactive experience for our students.  They did feel that not having mobile devices could be a barrier for integration, but 100% of the participants said they would use QR Codes in their classroom (results from the poll everywhere code).

Just a note of advice if you hold a QR Codes workshop, if you post QR Codes around campus as part of your workshop, make sure the code isn’t too far away…Also, if I could do this again, I’d probably have a prizes for the participants who got all the answers correct.  In addition, always double check and make sure your QR codes work.  YouTube videos seem to be the best when working with video.

If you want to start using QR Codes in your classroom, here are some excellent resources to get you started:

QR What – The Mobile Native
This is really the only resource you need.  Scott Newcomb (@SNewco) picked out the best of the best for us so we don’t have to spend time researching for QR Code resources.

The Best of QR Codes
@MissNoor28 put together this resource of awesome QR Code resources with classroom applications.

QR Code Comic Tutorial
I love this comic created by the Daring Librarian, who I like to call the darling librarian because all her stuff is just so cute.  She has a great QR Code Presentation on slideshare which is way better than mine.

In the Classroom

More than just a game
Alice Leung has some excellent classroom application posts on her blog, but this one is my favorite.  Don’t just follow her blog, but follow her on twitter if your interested in gamification.

QR Technology
Here’s a great post from Phil Barrett(@philcbarrett) that explains step by step how QR Codes were used in PE.

Here’s a resource with down-loadable worksheets you can implement right away from The Organized Classroom Blog.

And here are those QR Codes I mentioned earlier:

Some rights reserved by Periodic Videos

Blogging in 2012

I don’t really like New Year’s resolutions.  I find they make me feel guilty if I don’t follow through with my lofty goals for the new year.  And really, why do we need a new year to come around to set goals for ourselves?  So luckily in early December, I read a great blog post via Edutopia, Trying Something New in Your Classroom for 30 Days, by Heather Wolpert-Gawron.  A 30 day challenge, now that’s doable!

So here’s my 30 day challenge for myself.  As I was perusing tweet deck this morning, someone shared Top 100 Sites of 2011 from Tech&Learning.  I’m going to use one of those sites each day for the next 30 days and if it’s spectacularly awesome, I’ll write about it on my Blog.  So I will be blogging more in 2012, but just to clarify, it’s not a New Years Resolution, it’s a general goal…

Here’s the Ted Talk that inspired Heather Wolpert-Gawron’s Edutopia Post:


Screencasting in the Classroom

Let’s face it, you can’t always use the pause button in a classroom.  But that’s what screencasts allow students to do…pause, rewind, and re-watch teacher or student created videos until they “get it”.  Screencasting is a video of what’s happening on your computer.  It allows students to have access to information 24/7 and refer back to it later and not just when they’re in class.

Here are some examples of teacher created screencasts:

How to create a link in Glogster:

How to Create an MLA Citation in Word

Course instructions for “The Big Run”:

The examples above were created using Jing, a free Web 2.0 tool for capturing not only video recordings of your screen, but editable stills as well.

Jing is a great way to start screencasting, but if you’re looking for tools that have more features, Mashable put together a great list of tools which can be found here.

Are you screencasting in your classroom?  What’s your favorite screencasting tool?